
Call Us
+86 136 6007 9809
Call Us
+86 136 6007 9809

Oct. 24, 2023
Metal-bonded sealing washers are widely used for static sealing around threaded fittings, plugs, ports and other industrial fluid connections.
A correctly specified bonded seal can still leak if the mating surface is damaged, the washer is misaligned, the joint is tightened incorrectly,
or a previously used seal is installed again without evaluating its condition.
For engineers, maintenance teams and procurement professionals, reliable sealing therefore requires more than selecting the correct nominal size.
A practical installation relationship is:
Correct Seal + Correct Mating Interface + Correct Alignment + Controlled Compression + Correct Joint Tightening + Validation
This guide explains how bonded sealing washers should be installed, inspected and evaluated for replacement in industrial assemblies.
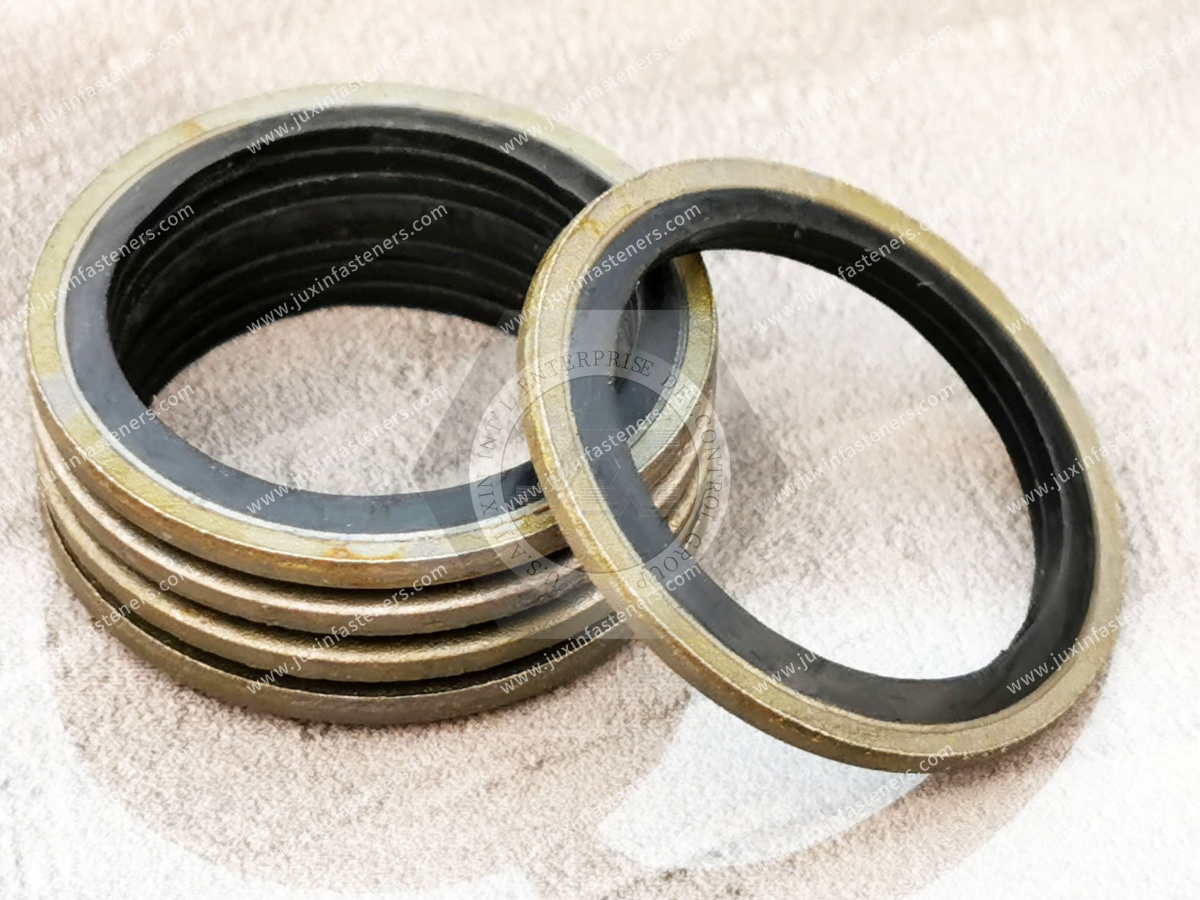
A bonded sealing washer combines:
a metal carrier
a bonded elastomeric sealing element
The metal portion provides structural support and helps control the installed geometry.
The elastomer provides the compliant sealing contact against the mating surfaces.
Bonded seals are primarily used for static sealing at suitable stationary interfaces such as:
hydraulic fittings
threaded plugs
ports
manifolds
pumps
valves
stationary fluid connections
They should not automatically be treated as dynamic seals for rotating shafts or reciprocating components.
A bonded seal does not work independently from the joint.
Its sealing performance depends on the interaction between the washer, fitting, mating surface and installation conditions.
Even the correct bonded seal may perform poorly when:
the sealing surface is scratched
contamination remains under the seal
the washer is installed off-center
the fitting geometry does not properly support the seal
the joint is insufficiently tightened
the joint is excessively tightened
the elastomer has already been damaged
an incorrect replacement seal is used
For this reason, leakage should not automatically be blamed on the rubber material or washer quality before the complete interface is examined.
Before assembly, verify that the component matches the required specification.
Depending on the project, check:
part number
inside diameter
outside diameter
thickness
metal carrier geometry
elastomer profile
metal material
surface finish
elastomer family
hardness, where specified
applicable drawing or customer specification
A washer that physically fits over the thread is not necessarily the correct sealing component.
Two bonded seals intended for similar nominal fitting sizes may differ in:
OD
thickness
elastomer geometry
carrier construction
material
hardness
Replacement parts should therefore be compared against the approved drawing, specification or validated sample.
Before installation, inspect the component for visible defects.
Look for:
cuts in the elastomer
tears
cracks
separation between metal and elastomer
deformation
contamination
corrosion
damaged coating
dimensional damage
A damaged sealing element should not be installed simply because the metal carrier remains intact.
Where the product design uses bonded metal and elastomer, visible separation or damage at the interface may indicate that the component should be rejected.
The applicable acceptance criteria should follow the customer's drawing, specification or inspection plan.
The condition of the mating interface can be as important as the seal itself.
Inspect for:
scratches
burrs
dents
corrosion
embedded particles
old seal residue
coating damage
contamination
irregular surface damage
A new bonded seal cannot necessarily compensate for a damaged sealing face.
The elastomer must establish continuous sealing contact with the mating interface.
A scratch or particle crossing the sealing contact region can create a potential leakage path.
This is why replacing the washer repeatedly without examining the mating surface may fail to solve a recurring leak.
The sealing surfaces should be appropriately clean before assembly.
Remove contaminants such as:
dirt
metal particles
old sealing residue
process contamination
loose corrosion products
Cleaning methods and cleaning agents must be compatible with the seal materials and assembly requirements.
Do not assume that every solvent is compatible with NBR, FKM, EPDM or other elastomers.
The bonded seal should sit correctly around the fitting, plug or fastener and against the intended sealing surface.
Misalignment can cause:
uneven compression
partial sealing contact
elastomer damage
extrusion
localized loading
The component should not be forced into an interface for which its geometry was not designed.
The elastomer must develop sufficient contact with the mating surface to create the intended seal.
However:
More Compression ≠ Better Sealing
Excessive compression can damage the sealing element or alter its intended geometry.
Insufficient compression may fail to establish the required sealing contact.
Correct compression depends on the complete assembly, including:
bonded seal geometry
elastomer properties
metal carrier
fitting design
mating surface
tightening condition
This is one reason generic installation values should not be applied across all bonded seals.
A bonded sealing washer does not have one universal installation torque.
The required tightening condition depends on factors such as:
thread size
fitting design
fastener or plug material
mating material
thread condition
surface treatment
lubrication condition
seal geometry
joint specification
Use the torque or installation procedure specified for the actual assembly.
A torque value copied from another fitting system may create a different clamp load in the actual joint.
Therefore:
Torque belongs to the joint specification—not to the washer alone.
For OEM assemblies, follow the validated drawing, work instruction or engineering specification.
Potentially, yes.
It is easy to assume that additional tightening always improves sealing.
That is not necessarily true.
Excessive installation load can potentially:
damage the elastomer
distort the sealing profile
alter the carrier geometry
damage threads
damage the mating surface
create an unintended compression condition
The correct response to leakage is therefore not automatically “tighten it more.”
The cause should first be identified.
Insufficient tightening can also contribute to sealing problems if the assembly fails to establish the required sealing contact.
Possible consequences include:
insufficient elastomer compression
incomplete contact
joint movement
loss of intended clamp condition
Again, the solution is to follow the specified assembly condition rather than relying on trial-and-error tightening.
This depends on the specific seal design and mating interface.
Some bonded seal designs may have geometry that makes orientation relevant, while others may be more symmetrical.
Do not create a universal orientation rule for every bonded sealing washer.
Instead, review:
seal profile
metal carrier geometry
fitting geometry
mating surface
drawing or assembly instruction
If orientation is controlled by the design, it should be clearly defined in the installation documentation.
Hydraulic systems are one of the common applications for bonded sealing washers.
Before installation, verify:
Fitting → Port → Seal Size → Seal Material → Fluid → Pressure → Temperature → Assembly Requirement
Particular attention should be given to:
correct fitting geometry
clean sealing faces
correct seal position
elastomer compatibility with hydraulic fluid
specified tightening procedure
A leak at a hydraulic fitting does not automatically mean the bonded seal itself is defective.
The entire connection should be inspected.
Bonded seals may also be used at suitable static pneumatic connections.
However, the same engineering principles apply:
correct geometry
compatible materials
suitable sealing interface
appropriate assembly condition
application validation
The fact that a component works in one hydraulic application does not automatically qualify it for every pneumatic connection.
This question requires more caution than the old rule “reuse if it looks good.”
A bonded sealing washer may have undergone:
elastomer compression
compression set
mechanical deformation
thermal exposure
chemical exposure
surface damage
aging
installation damage
Some changes may not be obvious from visual inspection.
For this reason, bonded seals should not automatically be assumed reusable.
Replacement should be considered when:
the application specification requires a new seal
the elastomer is cut, cracked or deformed
the metal carrier is damaged
bonding has deteriorated
corrosion is present
the seal has experienced unknown service conditions
the previous assembly leaked
maintenance procedures specify replacement
For safety-critical or reliability-sensitive applications, follow the OEM or equipment manufacturer's maintenance requirements.
Visual appearance alone does not prove that the elastomer has retained its original properties or compression behavior.
Reuse decisions should therefore be based on the validated maintenance procedure for the assembly—not simply appearance.
If a connection continues to leak after the bonded seal is replaced, repeatedly installing new washers may not solve the problem.
A structured investigation should consider:
Is the replacement actually the correct dimension and material?
Are there scratches, burrs, corrosion or deformation?
Is the washer aligned and tightened according to the assembly requirement?
Is the elastomer compatible with the actual fluid and temperature?
Has the application changed?
Is vibration or movement affecting the interface?
Was the connection actually designed for this type of bonded seal?
This troubleshooting sequence can prevent unnecessary supplier changes when the root cause is elsewhere in the assembly.
Possible causes can include sharp edges, burrs or installation damage.
Possible contributors include unsuitable geometry, excessive pressure conditions, incorrect seal selection or excessive deformation.
Long-term compression and environmental exposure can change elastomer behavior.
The extent depends on the compound and operating conditions.
An incompatible fluid may cause swelling, hardening, softening or other material changes.
Operating conditions outside the validated material range can affect sealing behavior.
The carrier material or coating may not be suitable for the environment.
Damage between the metal and elastomer can compromise the component.
The washer may be correct while the mating surface itself provides a leakage path.
Correct installation cannot compensate for an incompatible elastomer.
For example, the selection of NBR, FKM, EPDM, HNBR or another elastomer should consider:
actual fluid
temperature
pressure
environmental exposure
compound
hardness
seal geometry
If a replacement seal has the correct dimensions but the wrong elastomer, tightening it differently is not an engineering solution.
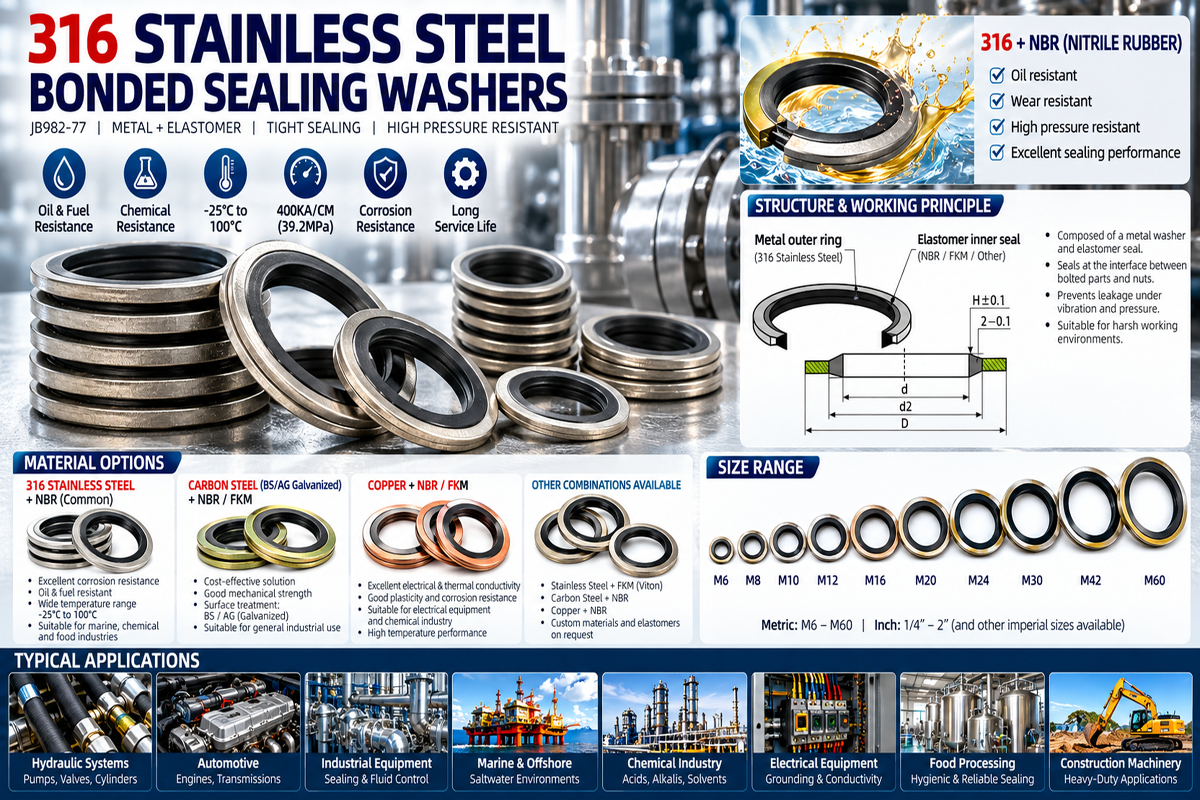
The metal carrier must also match the application requirements.
Potential options may include:
carbon steel
stainless steel
copper
other specified materials
Selection can depend on:
corrosion environment
mating material
mechanical requirements
surface finish
temperature
customer specification
Changing carrier material during maintenance or supplier replacement should be reviewed rather than assumed equivalent.
When a connection is disassembled, record relevant observations before discarding the old component.
Useful inspection points include:
location of leakage
seal position
elastomer condition
carrier deformation
corrosion
bonding condition
mating-surface condition
contamination
evidence of extrusion
uneven compression
Photographs of the seal before and after removal can also help supplier-quality and engineering teams investigate recurring problems.
When an OEM experiences recurring leakage, the failed bonded seal can contain valuable information.
Before cleaning or discarding it:
Photograph the installed condition where possible.
Record the connection location.
Record operating conditions at the time of failure.
Remove the seal carefully.
Photograph both sides.
Inspect the mating surfaces.
Preserve the component for engineering or supplier analysis.
This simple procedure can provide more useful information than receiving only a message saying “the washer leaked.”
For technical investigation, provide:
customer part number
supplier lot or batch information, if available
drawing
installation location
fluid or media
operating temperature
pressure conditions
installation procedure
tightening requirement
photographs
failed samples
quantity affected
service duration before leakage
This allows the supplier and customer engineering teams to investigate the same technical evidence.
For OEM production programs, incoming inspection requirements should be defined according to the drawing and quality plan.
Depending on the component, inspection may include:
ID
OD
thickness
elastomer profile
visual condition
carrier finish
elastomer hardness, where controlled
material documentation
bonding condition
packaging and identification
Inspection requirements should be appropriate to the risk and specification of the component.
Elastomer-containing sealing components should be stored under conditions appropriate to the specified material and applicable storage requirements.
Potential concerns include:
excessive heat
sunlight or UV exposure
ozone sources
contamination
deformation
incompatible chemicals
damaged packaging
The applicable material or customer storage specification should be followed where defined.
Long storage history should not be ignored simply because the metal carrier appears unchanged.
Recurring leakage does not automatically mean a different material is required.
Before redesigning the seal, determine whether the issue originates from:
wrong dimensions
wrong elastomer
mating-surface damage
installation procedure
joint geometry
operating conditions
pressure or temperature changes
If the original sealing architecture is unsuitable for the actual service conditions, engineering may then evaluate another sealing solution.
A design change should follow engineering validation rather than maintenance trial and error.
Before assembly:
confirm part number
confirm dimensions
confirm material
inspect elastomer
inspect metal carrier
inspect mating surfaces
remove contamination
During assembly:
position the seal correctly
avoid cutting or pinching the elastomer
maintain proper alignment
follow the specified tightening procedure
do not assume more torque improves sealing
After assembly:
complete the required inspection
perform leak or functional testing where specified
document abnormalities
follow the approved acceptance criteria
During maintenance:
inspect the removed seal
inspect the mating interface
investigate the cause of leakage
follow the approved reuse or replacement policy
A useful troubleshooting path is:
Leak Detected
↓
Confirm Correct Part
↓
Inspect Seal Condition
↓
Inspect Mating Surface
↓
Review Installation / Tightening
↓
Confirm Elastomer and Fluid Compatibility
↓
Review Temperature and Pressure Conditions
↓
Check Joint Geometry
↓
Identify Root Cause
↓
Replace / Correct / Redesign as Required
↓
Validate the Assembly
This prevents premature conclusions about material or supplier quality.
When maintenance identifies the need for replacement components, procurement should avoid purchasing only from nominal size.
Provide the supplier with:
2D drawing
part number
dimensions
metal material
elastomer specification
hardness, where controlled
surface finish
application conditions
required quantity
annual usage
inspection requirements
If no drawing exists, provide a physical sample together with the known operating conditions.
JUXIN FASTENERS supports OEMs, equipment manufacturers, maintenance organizations and supply-chain teams with standard and custom fastening and sealing components.
For bonded sealing washer projects, technical review can begin from:
Drawing → Specification → Part Number → Approved Sample → Application Data
For a recurring leakage or replacement project, useful information includes:
Seal → Fitting → Fluid → Temperature → Pressure → Mating Surface → Installation → Failure Evidence
For a new sourcing project, provide:
Dimensions → Metal → Elastomer → Hardness → Finish → Quantity → Validation Requirements
JUXIN FASTENERS can support drawing review, sample comparison and made-to-drawing bonded sealing washer sourcing based on customer specifications.
Email: info@juxinfasteners.com
Website: www.juxinfasteners.com
 MORE NEWS
Sep. 27, 2026
Sep. 27, 2026
Sep. 27, 2026
Contact Us
Tel.:
+86 020 8621 0320
+86 020 3121 6067
E-mail:
Technical Support:
Navigation
SEND INQUIREY